Please reference this post for files released April 2019 or earlier.***All template files are tested using modern browsers, such as Chrome and Firefox. We do not support or test using Internet Explorer.*** For previous templates, we combined all our coordinating templates (aka: Styles)—layouts and awesome interactions into one download file called a Course Starter. Each Course Starter has a different design and is packed with features like xAPI reporting, responsive mobile design, and pre-built interactions, so you can get more done in less time. Our new Course Starters for Storyline 3 / 360 and Captivate 2019 feature some changes on how we approach custom xAPI statements. Since each xAPI statement has at least 3 parts—and, each of those have at least 2 values themselves—this can get cumbersome very quickly. We felt this to be true in our templates. And, so did a few of our users. In response, we decided to simplify our xAPI statements a bit. Now, all you need to do to get custom xAPI statements from your eLearning Brothers templates is enter a verb ID and a verb display variable on an interaction, and you're good to go. Nothing else needed. We're tapping into the information that each tool is already providing with its out-of-the-box statements to avoid needing to enter redundant information. Let's look at how our updated xAPI statements work in the tool.
In Storyline, we've taken a slightly different approach.
We still rely on the values you enter into the xAPI configuration pane at publish, but we just can't directly access them afterward.
Because Articulate doesn't expose its system variables for many things, we had to get a little crafty.
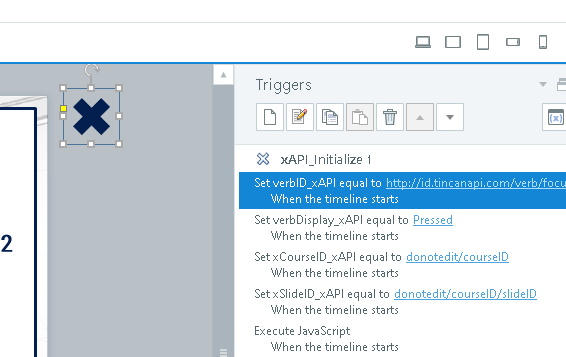
1.) Initialize xAPI
The first thing we do in a Storyline interaction is initialize our xAPI.
We do this by using an xAPI Initialize shape that sets our verb ID and Display values for the entire slide once the slide loads.
Since most learner actions in an interaction are pretty similar, it makes sense to template-ize this and set it once, for everything on that slide.
If you prefer to have unique values for each of the objects you're tracking on an individual slide, just add custom triggers to those objects, or wherever we've indicated the triggers run from.
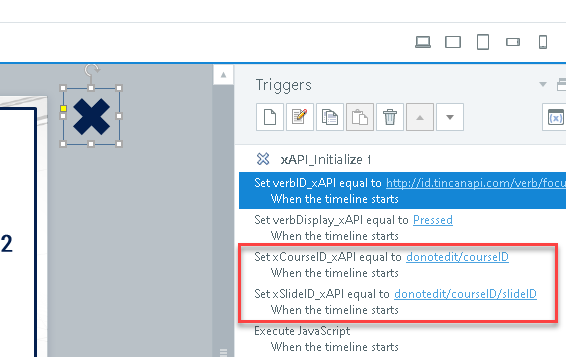
Once those values are set, the initialize shape executes a little Javascript to get some information about where our learner is in the course:
We query the LRS to get the ID of the last slide the current learner "experienced," as well as its parent. (These values come from whatever you enter in at publish. We're just backdoor accessing them.)
We then store those values to some SL variables for later use.
One quick note here—it may take a second for this initialization info to come back from the LRS (maybe more, depending on your LRS/setup, so do some testing).
If you allow the learner to start interacting with trackable objects before this info is back and stored in Articulate, you may get some errors on your statements.
Specifically, they may map to the wrong slide!
(Usually the leftover slide data from the previous interaction gets used here because it isn't being overwritten with new stuff.)
To combat this, just wait a second or two to load your interaction elements into the slide. This gives the two tools time to talk, and most always fixes the potential error before you encounter it. Popping some hotspots with no triggers over top of your interact-able objects for a time is another simple way to do the same thing.

Alternatively, you could get crafty with the script in the initialize shape and set an error-checking variable that flags something in your course.
That might be a topic for a future post if we have enough comments requesting it. Let us know below if you think it's something we should cover.
Back to it!
After we successfully query the LRS and store the values we retrieve, we pause.
If you're just trying to get statements going as quickly as possible, there's really nothing more you need to worry about.
In that case, you're done—enter one set of variable values at the top of the slide, and then publish.
Feel free to stop reading now, even.
It's that easy.
For those of you still interested and reading, I'll cover how we do the rest.
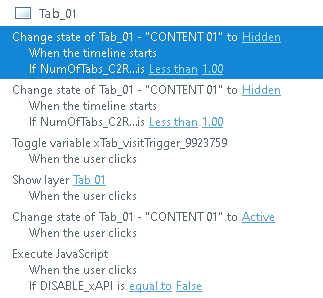
2.) Get The Current Object Label and Send the Statement
Object-specific actions get sent when a learner interacts with that object.
When a learner clicks tab 01, we send a statement that says they did just that.
The verb value and basis for our statement come from the initialize shape, but the individual statements are typically on the objects themselves.
Before the statements are sent though, we still need to gather object names.
Again, there's no automated way to do this.
In the old version, we did it with variables.
Now, we pick up the object names in Storyline very similarly to how we do it in Captivate: we use Javascript to grab the ID of the last object the learner interacted with, and use that for our object ID and display value.
One difference is that we rely on aria labels—or the accessibility text you enter for an object—to drive the object names and IDs.
This is due to how Storyline outputs its files; the two tools handle things a little differently in this regard as well.
Make sure you use the accessibility labels to title whatever objects you're tracking as intended in the LRS.
Double-check that "tab 01" object does in fact show that way in the accessibility pane.
Beyond that difference, the approach is very similar.
Object-level statements use the slide ID as their parent and the course as their group in context; any success or general statements are mapped to the slide and will report as slide-level data.
Once you have your course built, and verbs added to each slide, just publish to xAPI and deploy as you would with standard Storyline file.
And that's it.
We've tried to make it so you can get super-detailed, useful reporting out of your courses without having to know much at all about xAPI, and without having to do much setup either.
We think you'll like the new approach!
This article last reviewed Nov, 2018. The software may have changed since the last review.