The Guide to Translation in Lectora and Lectora Online
Prepare your titles for a global audience with Lectora and Lectora Online. Using the built-in Translation Tool, along with the Multi-language Publishing option, translating content for different languages is a straight-forward and time-saving process. In this article, we’ll go over the necessary steps to export, translate and integrate the text in your title for different languages.
Note: The steps are almost identical between Lectora and Lectora Online. We’ll point out the differences as we go.
Before Translating
Be sure to leave enough room for text and respect the nuances of the language. In some languages, punctuation is different (Thai uses none) while accents may be used in other languages (Spanish). Brush up on your linguistic investigation skills and be prepared to scan the document accordingly. While the facts and figures I’m going to throw out are hotly debated in the translation community, here are some basic “guidelines” to follow regarding the space of a language compared to English:
- Hebrew text tends to be 1/3 shorter
- French languages tend to be ¼ longer
- Scandinavian is almost word for word with the expectation of Swedish which tends to be longer
- German includes compound words which makes for longer line spacing
- Thai is longer and also includes no punctuation so only spacing is used to separate sentences
- Double byte characters such as Chinese and Korean are shorter
- Russian is debatable, but most agree it’s a little longer
Edit down the (English or other source languages) version, so it includes concise wording. This ensures the translation is more likely to come back clean and that the project scope is narrowed. Outsource translation firms often charge by the word, so you’ll be saving money too! Check for clauses or phrases to see if they can be reduced to a simpler construction. Then quickly scan your script for possible edits—look for unnecessary:
- Adverbs,
- Pleonasms,
- Metaphors,
- Inappropriate culture gestures or references,
- Clichés or colloquialisms, and
- Euphemisms
When possible, provide a document with general guidelines, as well as, the source language for reference. This can include:
- Common words to be used
- The difference between abbreviations—which should be kept and which ones should be replaced
- “Slang” that’s appropriate to use
- Instructions on using informal versus formal
Review the material for potential issues. Check for text on images to see if they need to be translated or recreated. Be sure the content is generalized when needed and refined to localized content when necessary. During a rather large project, we had a standard course translated into multiple languages. Because the red flag check wasn’t done, no one realized (of course until it was too late) that the content was instructing European countries about electrical safety using American standards (220 versus 110 and pictures of the wrong type of plugs).
Don’t forget additional resources in your title that will need translating. Audio, video, attachments and documents may need to be updated or replaced.
Finally, remember that translation is not the same as localization. While Lectora’s tools will help you to translate the text in your title, it’s up to you to design with your learners in mind. For example, symbols, currencies and formatting for dates and addresses will vary for different cultures and countries.
Exporting Text
The Translation Tool in Lectora will extract the text in your title to an RTF (rich text format file) or XLIFF (standard translation format). Lectora Online extracts the text to an HTML file. Both export formats are popular with today’s language service providers to create translation files.
To export the text in your title, follow these steps:
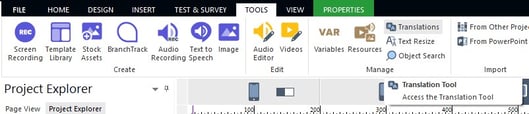
1. Select Translations from the Tools ribbon in the Manage section.
2. In the Translation Manager window:
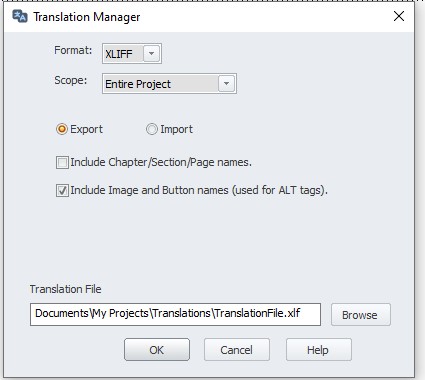
a. Select Format. XLIFF or RTF/HTML
b. Then choose the scope of text that you want to extract from your title. You may only want to translate a specific page, section, or chapter rather than your entire title.
c. Select the Include Chapters/Section/Page names option to include these names in the translation file. For example, if you have Page Titles, Breadcrumbs or a Table of Contents in your title, then you’ll need the labels used in your Title Explorer translated appropriately.
d. Select Include Image and Button names if you are developing content that must be accessible or Section 508 compliant. This option will translate the image and button names used for ALT tags.
e. If you’d like you can rename the file in the Translation File section. The recommended naming convention is CourseTitle_Language.
f. In Lectora specify the location for the exported translation file and click OK. In Lectora Online select Ok. The file is downloaded in whichever method your browser has as the default. For example, into your Downloads folder.
Managing the Translation File (RTF or XLIFF)
Your export file is created based on the options you selected in the Translation Tool to export your text. You can send this file to a translator to make the necessary translation changes.
Here are a couple of important tips and tricks that you should share or implement in your process:
- The RTF file created will include text that must not be altered. This text is displayed in red and is similar to the following: ##~~Do not edit this line.45~~##
- Use Arial Unicode MS when possible (it’s able to accommodate almost every language).
- Open the document in Notepad, WordPad, or a free non-formatting text editor like Notepad++ (Word sometimes transfers unseen characters which can cause spacing and phantom objects on the page). If you have chosen XLIFF, use an XLIFF editing tool.
- Check the document for white text.
- Have the source file available for reference (ie English course or original RTF or XLIFF).
When the text changes have been made, the altered RTF or XLIFF file can be imported back into the original title.
Managing the Translation File (Lectora Online/HTML)
Your export file is created based on the options you selected in the Translation Tool to export your text. You can send this file to a translator to make the necessary translation changes.
Here are a couple of important tips and tricks that you should share or implement in your process:
- The HTML file created will include text that must not be altered. It will be marked as such, similarly to the following: ##~~Do not edit this line.45~~##
- Use Arial Unicode MS when possible (it’s able to accommodate almost every language).
- Open the document in your favorite HTML editing application. Some options include Notepad or NotePad++. If you have selected XLIFF, then use an XLIFF tool or text editor.
- Check the document for white text.
- Have the source file available for reference (ie English course or original RTF / XLIFF).
When the text changes have been made, the altered HTML or XLIFF file can be imported back into the original title.
Importing Translated Text
Once the file has been updated with necessary translations, it’s time to apply those changes to the content in your title. You can do this by importing the RTF or XLIFF file with the Translation Tool.
1. Select Translations from the Tools Ribbon.
2. In the Translation Manager window:
 le
le
a. Select Import text from a translation file.
b. As many languages result in longer strings, it’s a good idea to select the option to Increase text box size if needed. Doing so will automatically increase the size of text blocks to accommodate longer text strings. Otherwise, you may have to spend significant time manually adjusting text blocks to fit the resulting text.
c. Choose the same scope as when you exported the RTF/HTML or XLIFF file.
d. Browse for and select the translation file.
e. Click OK.
The content within your title will automatically update to reflect the imported text from the translation file.
Publish Strings
While the Translation Tool will help you manage the text in your title, keep in mind that Lectora publishes a number of strings automatically as part of your course. For example, consider default feedback, Test Results, and confirmation or error messages that may appear—these will also need to be translated.
To work with this set of text, you’ll need to manage your Publish Strings.
1. Select Preferences/Lectora Preferences from the File Ribbon and select the Publish Strings tab.
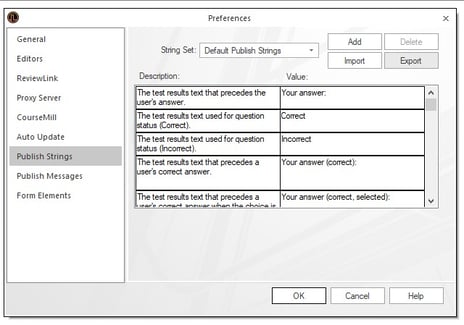
2. Select Export to save the default publish strings to a (.txt) text file. As with the RTF/HTML translation file, you can translate the text in a text editor.
3. Import the translated text file and specify a name for the Publish String Set.
4. Repeat this process to add as many translated string sets as you need.
5. Select the appropriate String Set for your title before you publish.
Multi-language Publishing (Lectora Desktop Only)
Translating one course into multiple languages can be time-consuming and complicated. However, Lectora provides you with a few options to help streamline the process.
One method of integrating multiple languages for the same course is to create a chapter for each language, and a landing page that branches you to the appropriate language based upon your learner’s selection.
If you are required to create separate courses in each language, then you will want to take advantage of Lectora’s Multi-language Publishing option. After your main title is published, Lectora will publish a different version of the same course for each language for which you have a translation file.
To publish your title to multiple languages, follow these steps:
1. First, you’ll need to use the Translation Tool to export the text in your title to a translation file using the process described above. Create a copy of the RTF/HTML file and translate it for every language you need.
2. Likewise, add translated Publish String Sets for each corresponding language.
3. Once you’re ready to publish, choose your Publish option and select the Languages tab from the Publish window.
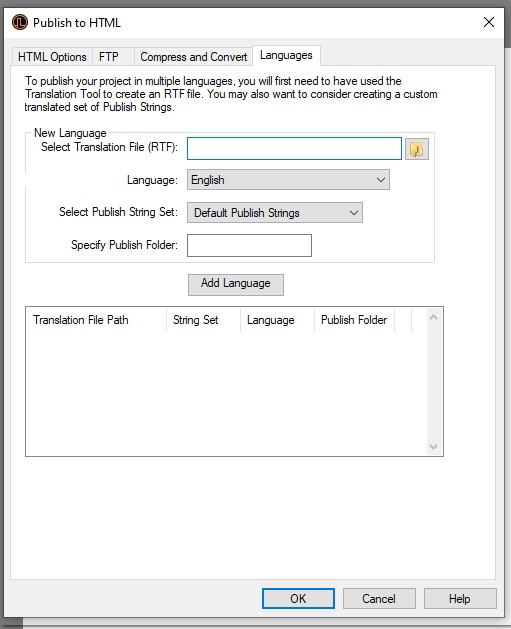
a. Browse for and select one of the RTF Translation Files from Step 1.
b. Select its corresponding language from the drop-down to declare the language in the HTML of your published title.
c. Select the corresponding Publish String Set from Step 2.
d. Enter the name of the Publish Folder—this will be a subfolder of your Publish destination folder. For example, if you are publishing your title to My Titles\Dog Training\html, and you specify a Publish folder named “Spanish”, then the Spanish translation of your title will be created in My Titles\Dog Training\html\Spanish.
e. Select Add Language. The information you specified is added to the table below.
f. Repeat Steps a through e for each language in which you want to publish your title.
When your title is published, you will find the subfolders you specified, and within each subfolder, Lectora will publish a copy of your title using the translated RTF file and Publish String Set to create a translated version of your course.
This article last reviewed Nov, 2021. The software may have changed since the last review. Please visit our Release Notes to learn more about version updates.