Office settings. Creating, editing, and deleting an Office. Enable Office admins to have access to multiple Offices. Export a list of Offices in an enterprise. Adjust Office caps to count or exclude expired/inactive learners.
June 8, 2022
What is an “Office”?
Offices allow administrators to organize their learners into groups based on their location, training need, department, or another relevant grouping. Offices are designed to:
- Categorize learners in order to run reports for specific groups.
- Allow administrators to delegate some of their administrative tasks to “Office Admins”. By default, Office admins can run reports for learners in their Office; however, they can also be granted permission to edit learners and enrollments.
Create an Office
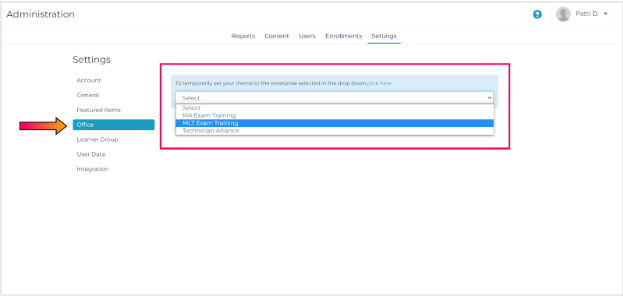
Step 1: Choose an Enterprise
Navigate to the “Settings” tab of the Admin Portal and select “Office” from the list of settings. Each Office must belong to an enterprise (see Enterprise IDs), so select an enterprise from the dropdown menu.
Note: If you only have one enterprise, you will see the main Office page instead of the enterprise selection dropdown.
Step 2: Create an Office
Add the name of your new Office in the “Full name” text entry box and fill out the optional fields if you wish:
- Abbr. (Optional): All Offices will appear as an abbreviation in many locations across the platform. If this box is left blank, the Rockstar Learning Platform will automatically assign each office an abbreviation based on the letters in the name of the office. However, if you wish to specify the abbreviation, add 2-4 characters (numbers or letters) to the abbr. box.
- Expiration (Optional): Adding an expiration date to an Office is a great feature to use if you are offering a free trial or a demo. Office expiration dates mean that any account assigned to that office will expire X days (the number of days added in the “Expiration” box) after the user was added to the Office. For example, if you offer a 14-day free trial, you can set an Office to expire after 14 days. Any user added to that Office would automatically lose access to the platform after 14 days.
- Office Cap (Optional): This setting limits the number of learners that can belong to the Office. Setting an Office cap is useful if you sold a specific number of licenses to this Office.
Note: Office Caps will also prevent people from joining an Office using a registration link (see General Settings) if the Office cap has been met.
When you have filled out these fields, select the "Add New" button to create your Office.
.gif?width=688&name=OfficeSettings_NewOffice%20(1).gif)
Note: If the Office you created does not save to the list, select the “Refresh Office List” button to clear the Office cache and try again.
Caution: Selecting the “Refresh Office List” button multiple times in a row will slow down the platform.
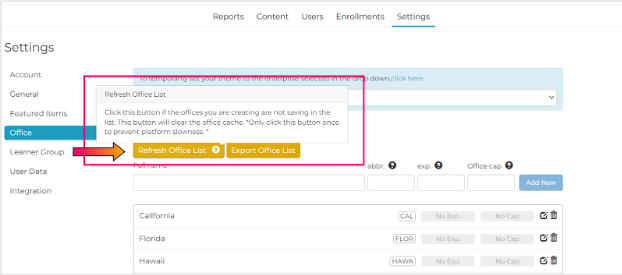
Export Office List
Select the “ Export Office List” button. By default, the list will be emailed to the current admin; however, you can change the email by adding a new one in the provided textbox. Select “Request report” to email the report.
Note: This list includes the Offices’ names, abbreviations, expiration periods, Office caps, and the number of active users.
Note: It may take a few minutes for the report to appear in your inbox.
.gif?width=688&name=OfficeSettings_ExportOfficeList%20(2).gif)
Edit or Delete an Office
Navigate to the “Settings” tab of the Admin Portal and select “Office” from the list of settings. All Offices will be displayed with their name, abbreviation, expiration date, and Office cap.
Edit an Office
To edit an Office, select the edit icon next to the Office name. Select the checkmark to confirm your changes or the “X” to cancel your edit.
Note: You can rename an Office, change its abbreviation, change its expiration date, and change its Office cap. These fields will automatically update across the platform without changing the learners enrolled in the Office.
.gif?width=688&name=OfficeSettings_EditOffice%20(1).gif)
Delete an Office
You can delete an Office by selecting the trashcan icon next to the Office name. Once selected, type “delete” in the textbox that appears and select the checkmark to confirm. Then select “Delete” in the popup window to permanently delete the Office.
Caution: Once an Office has been deleted, it cannot be undone. Learners assigned to a deleted Office will no longer be assigned to that Office.
.gif?width=688&name=OfficeSettings_DeleteOffice%20(1).gif)
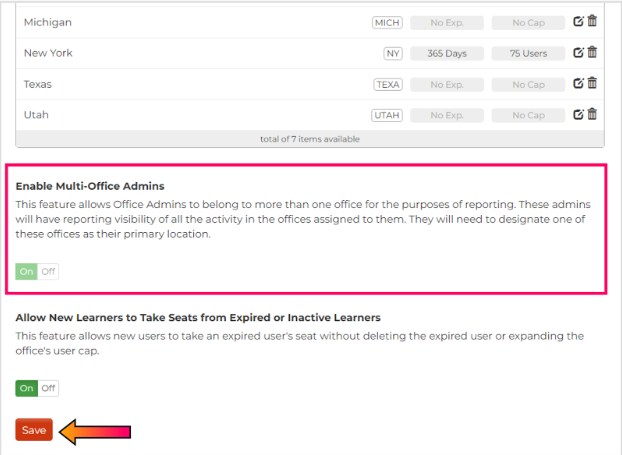
Enable Multi-Office Admins
Navigate to the “Settings” tab of the Admin Portal and select “Office” from the list of settings. Toggling this feature on will allow Office Admins to belong to more than one Office. These admins will be able to view reports for any Office assigned to them. Select “Save” after changing this toggle to save the new setting.
Caution: Once the multi-Office admin setting is enabled, it cannot be disabled.
Note: Each Office Admin needs to be assigned to a primary Office even if they can view multiple Offices.
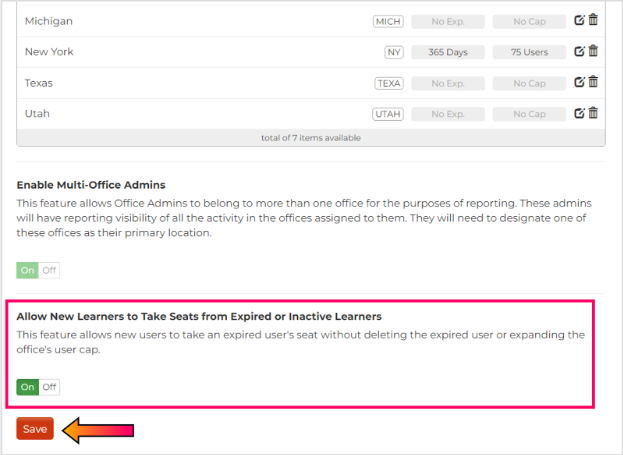
Adjust Office Cap to Include or Exclude Inactive/Expired Learners
By default, the “Allow New Learners to Take Seats from Expired or Inactive Learners” setting is toggled “On”.
When this setting is “On”, inactive/expired users do not count towards the Office cap. Newly added learners will automatically be able to take inactive/expired learners’ “seats” in the Office cap.
Toggling this feature “Off” will count expired/inactive learners as part of the Office cap. This means that inactive/expired learners would have to be manually removed from the Office in order for a new learner to take their “seat”. Administrators could also increase the Office cap so that new learners could be added.
Select “Save” after changing this toggle to save the new setting.
Caution: If the Office is used by a company to sell licenses, we recommend toggling this feature “Off”. If new learners are able to automatically replace expired/inactive learners, people with a registration link could join the office without paying for the license.